There’s a lot of controversy and debate about inversion therapy. We want to bring out some more facts. Inversion therapy is not a long-term cure. It’s a short-term cure. It’s designed to distract and open up the vertebra while you’re upside down. It reduces irritation of the nerve root as the space called the intervertebral foramen is becoming more open or wider. As a result of that, people get relief.
When you suffer from pain, all you want is a relief. Taking meds, injections, things are invasive, you obviously need to be very careful.
Mayo Clinic says that inversion therapy can be very dangerous for many people. They say “many people”, not all people; so we don’t want you to jump the gun yet, but people with cardiovascular disease, increased blood pressured and increased ocular pressure within the eye called glaucoma – those particular candidates need to be very careful before doing inversion therapy.
When you’re inverted upside down, the blood supply is rushing into the head, into the eyes, causing increased pressure to the eyes and increased pressure to the brain. So inversion therapy does have his credits – it does open up the disc spaces, it does reduce irritation of the nerve root, it will give you short-term relief, although it’s not going to correct anything. However, people who are candidates for high blood pressure, glaucoma, cardiovascular disease need to get clearance with the family, medical physician or a specialist to see if they can do this particular treatment. It would be recommended not to go completely upside down, but maybe at a 45-degree angle which obviously is safer than being in an upward or a downward position as compared to this.
How to use the inversion table?
If you’re like most people you’re probably looking for a way to reduce back pain, reduce stress, improve circulation, improve posture, return balance and symmetry to your body or decompress after a good workout. In the following inversion table guide, you will learn more about your inversion table and it consists of four parts:
- balanced settings
- partial inversion
- total inversion
- the most common questions and answers
In order to test the balanced settings of your inversion table there are three settings that we need to consider.
First the pivot arms. They need to lock into place until you become comfortable with your inversion table. It’s recommended that you use the pivot arm at the third and the last hole.
Next, we need to consider the nylon strap that’s at the base of the mainframe. This can be adjusted for a greater or lesser degree of inversion. You need to make sure that it’s connected firmly onto the mainframe. When the strap is connected you won’t be able to go totally inverted. Start out with about a 45 degree angle or whatever you feel comfortable with.
Finally make sure the adjustable boom is positioned properly.
Once you have all the settings set properly, you can get started with your new inversion table. The first time you’re using it, it’s recommended that you use a spotter. The first thing you need to do is stand on the end step frame and then pull the spring-loaded pin. Make sure it locks into place to secure your ankles and feet. This is going to support you as you rotate back and inverse on the table. Next, lay back and lay your head on the table and rest your hands on your chest. Half your bodyweight should be positioned above this pivot point, and the other half below this pivot point. You can rotate either way, by moving one or both arms back.
After you’ve inverted for a little bit your body may have become stretched or elongated and when you come up you may not have come up all the way. So to help that out, all you need to do is slightly bend your knees. You’ll slide down and be back into the upright position.
If you lay back on the table with your arms on your chest and there is no movement on the table, this means you have an incorrect passive setting. What you need to do is step off the table and reset the adjustable boom by increasing it by one inch. This rotation is too aggressive because the adjustable boom is set to one inch too short. If you rotate back very quickly without using your arms you know that the settings are not correct. This is called an incorrect aggressive setting, so to fix this we will lengthen the boom by one inch.
You don’t have to totally invert to achieve benefits from your version table. Many people won’t go past a 45 degree inversion so go your own pace and do what’s best for you.
To get the table to totally invert, you need to disconnect the nylon strap from the main frame. It’s easy just like before take your arms back one at a time and then your body will rotate so you’ll be in total inversion. You can use your hands once you’re down in this position and make sure your back isn’t touching the back of the main frame. Be sure to practice good deep breathing while you’re doing this.
You also want to stop in the horizontal position and rest there for a few moments so you don’t get dizzy on the way back up. When you’re ready, hands placed at the side, bend your knees slightly. Your body rotates right back up to the upright position.
What angle should I invert?
You should pick an angle that’s safe for you. Your body may be most comfortable at a 45-degree angle. Make sure you stop if you feel any type of discomfort.
What about an increased blood flow to the brain?
Extra blood flow to the head occurs the first time you invert. It’s good for you, it’s healthy; oxygen rushes throughout your body with increased blood flow. You’ll get used to this feeling and enjoy it more and more.
How long should I invert?
You should invert for the amount of time that’s comfortable for you. You should start by inverting for one to two minutes and then work your way up to 10 to 15 minutes. No pain no gain does not apply to your version table. So go at your own pace, take your time and enjoy your inversion table!
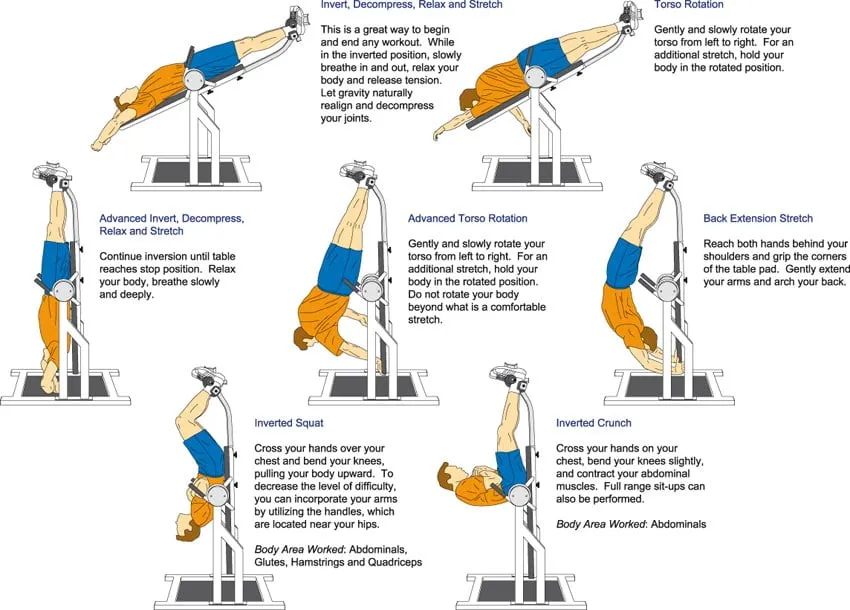
Some examples